It's been a busy week or so with Easter and this past weekend our baby girl was baptized. We enjoyed the beautiful weather and time with family. On a more forward-looking note I am heading to Las Vegas this coming weekend and am looking forward to some much needed sun, pool, and relaxation time. :)
Only a few more posts before I reveal the finished nursery! I am excited to share her beautiful room... it makes me smile when I walk in because it's girly and pretty and fun. I love my son's room but there is something so fun about this girly room. :)
I wanted to add in some teal accents in the room besides the inside of the dresser drawers so I looked to the curtains and the crib skirt. I found some thin polyester/cotton blend dark teal fabric on clearance at the craft store for $3 per yard that I could use but there wasn't enough to make curtains and I really wanted thermal curtains for her room. Thermal curtains have a lined back that keeps out sun and heat. Her room has a large window that gets afternoon sun which, during summer, makes the room really heat up. This will help keep the room temperature bearable.
I found teal thermal curtains for a decent price at Wal-Mart. I bought two panels for $18 each. They were only 84", I like curtains to go from the ceiling to the floor and they were kind of plain because they were one solid color so I decided to give them an updo (instead of a redo). I used the cheap fabric to add length and a little more visual appeal. It was pretty easy and I like how they turned out. For only about $45 and an hour of my time I have great thermal curtains for the nursery.
I was able to use the leftover fabric I had from the curtains and two pillow cases, that I bought from Goodwill for $2, to create a crib skirt. I saw an interesting idea on this blog where she used panels and attached them to the crib. I used the same idea but used ties instead. I measured the crib, only the three front sides, and sewed panels using the pillow cases and the extra fabric. In the end I spent about an hour and $5 for this DIY crib skirt.
All in all these two DIY projects took about 2 bours and $50!
Looking forward to a fun and rainy week here... Do you have any DIY plans this week?
<-Kassy->
Pages
▼
4.28.2014
4.16.2014
DIY Bird Mobile
When I was first pregnant with #2 I was a little worried that I would end up loving one kiddo more than the other or that I wouldn't have the same love for my little girl that I have for our son... we think he's pretty great. But it's been great getting to spend time with our baby girl and it's amazing how much "extra" love I have for her and still love our son. When I thought I had reached my love limit (haha) God showed me that in fact I had more love to give. :) It's been wonderful and I love spending time with both of them everyday.
One of my favorite projects from my son's nursery was his mobile. It's still hanging above his changing table and we talk about the colors and shapes and count them every day. I knew a mobile was on the DIY list for our baby girl's nursery too.
Her nursery theme is birds with pink, teal, and gold. I envisioned a mobile where the birds "fly" out from under a birdcage. For this project the birdcage I used is from Amazon. It was originally a brown color but I spray painted it gold to match the rest of the accents in the room. The reviews weren't great but I was actually pleasantly surprised. It was definitely perfect for the mobile.
The birds were made from fabric scraps in the colors of the nursery. I found this free pattern and used that for all of the birds. The birds sewed up pretty quickly too.
When finished with the birds I used fishing line to hang them from the cage. I staggered them at varying lengths and from different wires. The clear fishing line makes them look like they are "flying".
We hung the mobile from the ceiling with ribbon above the changing pad. I can't wait until it starts catching our baby's eye and we can talk about the colors and what sounds a bird makes and count how many birds there are. :)
Total Bird Mobile Cost:
Fabric scraps: FREE!
Fishing Line: $1
Bird Cage: $29
Spray Paint: $3
Total: $33!!
This is an easy, cheap DIY that adds some fun, whimsy, and character to the room. The nice thing is that you can do it for any theme... check out my son's nautical mobile here which was only $20!
If you have a theme but aren't sure what you could do for a DIY mobile then let me help brainstorm.. just let me know in the comments or send me an email and I'll brainstorm a few ideas for you.
<-Kassy->
4.15.2014
Furnishing a Nursery for Under $350!
Since I became a full-time mom at home we have focused on our budget. In order to make one income work for three (now four) people is not easy... but with careful budgeting it can certainly be done. My family is proof of this! One of my great joys in life is knowing I got a good deal. Most of the time I can remember the price of anything I buy... even years later. It's because I diligently search for deals and take pride in my work. This is a major factor in sticking to our budget. The new nursery was no exception! The major furniture pieces of the nursery are generally the biggest budget items so I spent a lot of time searching for deals on these items - crib, dresser(s), and rocker.
Steps to find furniture on a budget:
1. Write down your criteria... color, dimensions, style, price, etc.
2. Armed with your criteria from step 1, a tape measurer, and cash go search for the perfect piece! I recommend cash because with a card you'll just settle for a higher priced item because it's easy to swipe your card. In your quest check these great resources:
- Craigslist
- Freecycle
- Goodwill
- Local Consignment/Thrift Shops
- Buy/Sell/Swap Groups on Facebook
- Antique Malls
- Flea Markets
- Ask around... sometimes family and friends have pieces in their basement/storage
3. Be open-minded. Sometimes you need to get creative when you are on a budget!
For the crib I had a couple criteria: 1) white, 2) convertible crib, 3) under $100... and yup I found one. :) It was a Graco Charleston Convertible Crib that was used for two years and they decided on a different big kid bed for their daughter and just wanted it gone so they gave me the crib and the mattress for $45... oh yeah... good deal since it retails for over $200! With any second hand furniture I cleaned it and touched up the paint where there were some knicks and scratches and it looks great. We are not using the mattress because putting a newborn should be on a firm mattress and used ones have some give from use. One thing I would like to note is that while we got a great deal on the crib it was missing a few screws... luckily a quick trip to the hardware store (and less than $1) and my hubby had it all fixed up and ready to go. It may even be more secure now!
For the dresser(s) I had these criteria: 1) long dresser at about 30" height that I could use as a changing table too, 2) white, 3) some girly/cute details, 4) solid, not flimsy particle board, 5) under $150 for a set of two or $100 for one. I actually found a great set of two that met almost all the criteria for $80! The set was not white, it was an original wood so it needed to be painted white. I saw this as an opportunity to try out this and this. Because I was pregnant and it was cold so I had to paint inside the house I did not use the oil based Zinser primer like the blog recommended. They make a water based version and that is what I went with and still it worked fine... no sanding! I painted two coats primer and 2 coats white/teal. I am going to put a clear coat finish on the tops of the dressers in the next couple of weeks because that sees more wear and I want to make sure it stays in good condition. Unfortunately, I jumped right into the project before I took any before pictures so I am sad I can't show a true before and after but I do have pictures of the drawers.
As you can see the drawers have a beautiful flower design but I will warn that the more intricate the design the more difficult it is to paint. Those flowers were a pain, but man, they turned out awesome! Also, you can see the dingy handles which I considered replacing but didn't want the expense since there were so many. Instead I thought I would spray paint them gold. I cleaned them first and actually liked the results. I am going to post about that and a how to in the next week so stay tuned.
The end results were better than I imagined!
The last item on the list was a rocker. My criteria was 1) rocker, recliner, overstuffed, 2) faux/real leather (easily to clean), 3) under $150, 4) new... I managed to convince my hubby that a used one wasn't a good idea because you don't know what has been on it and that's not really sanitary for nursing. Well, there's basically no such thing as an overstuffed, leather, rocker, recliner chair that is NEW for $150. I really tried to stay in the budget on this one. I did find a good deal on the chair we purchased. It was a Black Friday deal online at Kmart.com. I used Ebates (they give you cash back for buying things online... really awesome) along with the Black Friday sale price and the final was $180! Not a bad deal in the end. It was worth it considering how much we have already used it... It hung out in our living room until the nursery was ready. :)
In the end our total for nursery furniture was $335:
Crib: $45
Dressers: $80
Supplies: $30 (primer, paint, and a little "cleaner" for the handles)
Rocker Recliner: $180
I was impressed by how well we did... we definitely came in under budget and we love all of the furniture pieces.
Have you found any great furniture deals lately? Any furniture makeovers in the works? Tell me about them!
<-Kassy->
Steps to find furniture on a budget:
1. Write down your criteria... color, dimensions, style, price, etc.
2. Armed with your criteria from step 1, a tape measurer, and cash go search for the perfect piece! I recommend cash because with a card you'll just settle for a higher priced item because it's easy to swipe your card. In your quest check these great resources:
- Craigslist
- Freecycle
- Goodwill
- Local Consignment/Thrift Shops
- Buy/Sell/Swap Groups on Facebook
- Antique Malls
- Flea Markets
- Ask around... sometimes family and friends have pieces in their basement/storage
3. Be open-minded. Sometimes you need to get creative when you are on a budget!
For the crib I had a couple criteria: 1) white, 2) convertible crib, 3) under $100... and yup I found one. :) It was a Graco Charleston Convertible Crib that was used for two years and they decided on a different big kid bed for their daughter and just wanted it gone so they gave me the crib and the mattress for $45... oh yeah... good deal since it retails for over $200! With any second hand furniture I cleaned it and touched up the paint where there were some knicks and scratches and it looks great. We are not using the mattress because putting a newborn should be on a firm mattress and used ones have some give from use. One thing I would like to note is that while we got a great deal on the crib it was missing a few screws... luckily a quick trip to the hardware store (and less than $1) and my hubby had it all fixed up and ready to go. It may even be more secure now!
For the dresser(s) I had these criteria: 1) long dresser at about 30" height that I could use as a changing table too, 2) white, 3) some girly/cute details, 4) solid, not flimsy particle board, 5) under $150 for a set of two or $100 for one. I actually found a great set of two that met almost all the criteria for $80! The set was not white, it was an original wood so it needed to be painted white. I saw this as an opportunity to try out this and this. Because I was pregnant and it was cold so I had to paint inside the house I did not use the oil based Zinser primer like the blog recommended. They make a water based version and that is what I went with and still it worked fine... no sanding! I painted two coats primer and 2 coats white/teal. I am going to put a clear coat finish on the tops of the dressers in the next couple of weeks because that sees more wear and I want to make sure it stays in good condition. Unfortunately, I jumped right into the project before I took any before pictures so I am sad I can't show a true before and after but I do have pictures of the drawers.
As you can see the drawers have a beautiful flower design but I will warn that the more intricate the design the more difficult it is to paint. Those flowers were a pain, but man, they turned out awesome! Also, you can see the dingy handles which I considered replacing but didn't want the expense since there were so many. Instead I thought I would spray paint them gold. I cleaned them first and actually liked the results. I am going to post about that and a how to in the next week so stay tuned.
The last item on the list was a rocker. My criteria was 1) rocker, recliner, overstuffed, 2) faux/real leather (easily to clean), 3) under $150, 4) new... I managed to convince my hubby that a used one wasn't a good idea because you don't know what has been on it and that's not really sanitary for nursing. Well, there's basically no such thing as an overstuffed, leather, rocker, recliner chair that is NEW for $150. I really tried to stay in the budget on this one. I did find a good deal on the chair we purchased. It was a Black Friday deal online at Kmart.com. I used Ebates (they give you cash back for buying things online... really awesome) along with the Black Friday sale price and the final was $180! Not a bad deal in the end. It was worth it considering how much we have already used it... It hung out in our living room until the nursery was ready. :)
In the end our total for nursery furniture was $335:
Crib: $45
Dressers: $80
Supplies: $30 (primer, paint, and a little "cleaner" for the handles)
Rocker Recliner: $180
I was impressed by how well we did... we definitely came in under budget and we love all of the furniture pieces.
Have you found any great furniture deals lately? Any furniture makeovers in the works? Tell me about them!
<-Kassy->
4.14.2014
Pinterest Review: Wool Dryer Balls
I had not imagined how much extra laundry I would be doing for each of my little ones. They are so little.... yet still so much laundry! And the thing about laundry is that it is a never ending vicious cycle. As soon as I finish a few loads the next ones are already piling up. Yuck. Oh well... lucky I love hanging up their cute little clothes so for now it's not so bad.
I noticed a couple months ago that our dryer was taking too long to dry clothes. Each load is large but needing two drying cycles isn't normal. Aside from a quick dryer tune-up (cleaning out the lint), I found a simple DIY for wool dryer balls. They are used to create a more efficient drying cycle (the ball itself) as well as used to soften clothes (vinegar) and give them a fresh scent (essential oils). I made four from two skeins of wool yarn. I also used lemon instead of lavender. A couple things to note about this little DIY:
- It takes a long time for the balls to dry after dunking in the vinegar mix. Give yourself at least 24 hours but probably 48 is best.
- I did not find that the clothes smelled like a fresh lemon scent. There was no lemon-smelling-goodness to be found.
- Beware of one unraveling! If you even see just a little string unravelled tie double triple knots all over. I had one that slightly unravelled and I thought I put it back together well enough.... I had a tangled mess after the next drying cycle.
- I no longer needed extended drying times... they helped dry the clothes much faster than without. In that respect they worked great!
For a small amount ($10 for wool and I used the vinegar and essential oils I had on hand) you can have better drying times and softer clothes for a long time... years even. I think it's worth it over those dryer sheets that have nasty chemicals and leave a film on your dryer screen and clothes.
Try them out and let me know how they work for you!
<-Kassy->
4.09.2014
DIY Framed Initials
As the nursery was coming together I decided to incorporate her name or initials somehow to make the room more personal. I had previously seen this beautiful nursery and loved the framed initials above the crib. It would go nicely on our wood accent wall... a white frame to match the furniture and gold letters to match the other accents in the room. Perfection!
I planned on buying a white frame but gosh they are expensive when you want one that is the size that I needed. I priced them out between $50-100 and the lower priced frames were boring and flimsy. That's when my handy hubby jumps in with a bright idea to save the day. :) He had some leftover baseboard trim from this project and leftover door trim from this project so he went to work combining the two to create a beautiful, sturdy frame. He stacked the two pieces together and glued them BEFORE he made any cuts. Why you ask? Well because he's so smart! He knew that making all those cuts would be timely but also no cut is perfectly cut at the correct angle which would cause so much headache when matching them up later.
Here are a couple pictures of the side of the frame where he lined up the outside edges and where the boards meet at the corner. Looks like an exensive frame but really it's free... FYI if you didn't have these matetials on hand like we did then you could pick up single pieces for about $10 at a big box hardware store. Not bad! We painted a coat of white over the frame to finish it off. We used the white paint we used for the dressers... stay tuned for that post coming up in a couple days, it's a good one!
Here is the finished product laid out on the floor to get the positioning right before hanging it.
And here it is up on the wood wall... pretty right?
The total for this project is $22 ($32 if you need to buy the trim).
Check back because soon I will post a full nursery reveal where you can see the entire wood wall with these framed intials as well as everything else.
Until then let me know what you think of this project. I could see this above a couch/loveseat, in a foyer, hall, or a smaller scale with just a single surname initial for a gallery wall... basically it's pretty versatile, just get creative!
<-Kassy->
I planned on buying a white frame but gosh they are expensive when you want one that is the size that I needed. I priced them out between $50-100 and the lower priced frames were boring and flimsy. That's when my handy hubby jumps in with a bright idea to save the day. :) He had some leftover baseboard trim from this project and leftover door trim from this project so he went to work combining the two to create a beautiful, sturdy frame. He stacked the two pieces together and glued them BEFORE he made any cuts. Why you ask? Well because he's so smart! He knew that making all those cuts would be timely but also no cut is perfectly cut at the correct angle which would cause so much headache when matching them up later.
Here are a couple pictures of the side of the frame where he lined up the outside edges and where the boards meet at the corner. Looks like an exensive frame but really it's free... FYI if you didn't have these matetials on hand like we did then you could pick up single pieces for about $10 at a big box hardware store. Not bad! We painted a coat of white over the frame to finish it off. We used the white paint we used for the dressers... stay tuned for that post coming up in a couple days, it's a good one!
For the initials I picked up some letters from Hobby Lobby. They were originally $10 but you can use a 40% off coupon from your mobile phone to lower the price to $6 each, $18 for all three letters. The letters were a distressed black so I picked up a small gold spray paint can for $4. I used the leftover spray paint to paint the curtain rod which was a dark brown... I figured gold would tie it all together!
And here it is up on the wood wall... pretty right?
The total for this project is $22 ($32 if you need to buy the trim).
Check back because soon I will post a full nursery reveal where you can see the entire wood wall with these framed intials as well as everything else.
Until then let me know what you think of this project. I could see this above a couch/loveseat, in a foyer, hall, or a smaller scale with just a single surname initial for a gallery wall... basically it's pretty versatile, just get creative!
<-Kassy->
4.08.2014
DIY Wood Accent Wall
As I was contemplating some neat ideas for our baby girl's nursery I decided to check out my home decor boards on Pinterest (you can follow me on Pinterest here). Sometimes I forget what I like and have on my dream boards. :)
One of the pins that struck me was this pallet wood wall project over here. I thought this would be the perfect addition to the nursery and fit in with the natural, girly bird theme. I, of course, needed to keep this project within a tight budget so at first I thought the best option was to use pallets. I've seen those projects and they turn out great plus people have found pallets for free or cheap and that is right up my alley!
I did some research and came to find out that pallet wood is not recommended in nurseries (or in any interior space) because of the bugs that infest the wood as well as the chemicals used on the wood. So in my search for the next best option I found this project over at Thrifty Decor Chick that turned out really nice!
We actually found the wood planks pictured below at a big box hardware store AND lucky for us there was a special promotion where we received a rebate for 50% of the cost... Music to my ears! We bought the amount we needed for the wall (8' x 10' = 80') plus two extra boxes for mistakes and to cover any pieces that were not straight or may have been broken. We also bought a pint of stain and two pieces of pine quarter round to trim each side. I have the full budget at the end of the post but for now let's check out a few pictures from the project and talk about the process.
My hubby and father-in-law installed the wood in just a couple hours using a nail gun so if you have one then use it and if you've got a father-in-law (or a brother or a cousin or a neighbor.... you get the idea) then rope him/her in to help! Before they started they marked all of the studs along the wall which is where they strategically placed the joints of the wood planks so that when they nailed the end the nails would hit the studs. This ensures the planks are secured firmly to the wall. The guys started from the top, at the ceiling, and worked down to the floor. They staggered the planks too because I liked the way that looked since one plank would not cover the length of the wall. The floor trim was removed so when the last plank was shy of the floor it worked ok because we were planning to replace the trim which would cover the gap.
Once the wood was installed we taped the edges and stained the planks. We used Minwax stain in Java. We applied the stain to 3-4 rows starting at the top and then would wipe the stain off. This gave it enough time to soak in to the wood a little. We repeated this to the bottom. Stain is pretty messy so even though I taped the edges there was spray from the brush strokes that hit the walls and ceiling which we touched up later. After completing the stain on the planks we stained the quarter round trim pieces and then reinstalled the trim at he floor. Next we installed the quarter round trim and that completed the project! In total I would estimate the project took 2 hours for 2 guys to install the wood, 1 hour for the two of us to stain and about an hour to put the finishing touches on the project and clean up... 4 hours total! I have to say that I think it looks great!
Here's the budget breakdown:
$67 wood planks (originally $134 but we received a rebate for 50%)
$7 stain
$16 pine quarter round (about $1 per linear foot... 2 corners x 8' height)
TOTAL: $100!!!
The supplies I had on hand were the nails, nail gun, tape, we reused the baseboard trim and just touched up the paint. And that's it! Loved the results and it was well worth the $100 and 4 hours.
What do you think? Could you see this on a wall in your home?
<-Kassy->
One of the pins that struck me was this pallet wood wall project over here. I thought this would be the perfect addition to the nursery and fit in with the natural, girly bird theme. I, of course, needed to keep this project within a tight budget so at first I thought the best option was to use pallets. I've seen those projects and they turn out great plus people have found pallets for free or cheap and that is right up my alley!
I did some research and came to find out that pallet wood is not recommended in nurseries (or in any interior space) because of the bugs that infest the wood as well as the chemicals used on the wood. So in my search for the next best option I found this project over at Thrifty Decor Chick that turned out really nice!
We actually found the wood planks pictured below at a big box hardware store AND lucky for us there was a special promotion where we received a rebate for 50% of the cost... Music to my ears! We bought the amount we needed for the wall (8' x 10' = 80') plus two extra boxes for mistakes and to cover any pieces that were not straight or may have been broken. We also bought a pint of stain and two pieces of pine quarter round to trim each side. I have the full budget at the end of the post but for now let's check out a few pictures from the project and talk about the process.
My hubby and father-in-law installed the wood in just a couple hours using a nail gun so if you have one then use it and if you've got a father-in-law (or a brother or a cousin or a neighbor.... you get the idea) then rope him/her in to help! Before they started they marked all of the studs along the wall which is where they strategically placed the joints of the wood planks so that when they nailed the end the nails would hit the studs. This ensures the planks are secured firmly to the wall. The guys started from the top, at the ceiling, and worked down to the floor. They staggered the planks too because I liked the way that looked since one plank would not cover the length of the wall. The floor trim was removed so when the last plank was shy of the floor it worked ok because we were planning to replace the trim which would cover the gap.
Here's the budget breakdown:
$67 wood planks (originally $134 but we received a rebate for 50%)
$7 stain
$16 pine quarter round (about $1 per linear foot... 2 corners x 8' height)
TOTAL: $100!!!
The supplies I had on hand were the nails, nail gun, tape, we reused the baseboard trim and just touched up the paint. And that's it! Loved the results and it was well worth the $100 and 4 hours.
What do you think? Could you see this on a wall in your home?
<-Kassy->
4.07.2014
DIY Dishwasher Tabs
I'm feeling good these days... finally getting some sleep. My baby girl is a little over six weeks now and she has just turned a corner in the sleeping/eating departments. I knew that it was going to be a little more difficult with her than my son because she was born five weeks early but geez... I have been a zombie the last six weeks! She was nursing every 2-3 hours and that means she wasn't sleeping through the night. My husband and I were so perplexed at how hard it is to wake her and keep her awake during the day and pretty much impossible to get her to sleep at night?!
I recently ran out of dishwasher tabs and since we run the dishwasher every other day it's not really something I can go without. I haven't ventured out too many times on my own with them because I'm still adjusting to two kiddos. I certainly don't like going out for one last minute item, if I'm going out I'm making a morning of it and getting it all done. It's too much work for a five minute grocery store run! So I found this recipe for DIY tabs and I happened to have all the ingredients. Worth a try, right?
I went to work putting them together and I chose the solid tab route using two ice cube trays since that is what we are used to. I was so excited to try them because of this worked it would be amazing... cheap and I would know the ingredients in them. Win!
I ran the dishwasher the next morning and was so disappointed with the results. My dishes were foggy and had a residue. Barely even clean! Darn! I tried them a few more times on different settings (hi-temp, extra rinse, etc) and still the same results.
It's always frustrating to me when it "works great" on the internet and fails in real life so I went back to the blog where I found the recipe to see if anyone that commented had the same problem. Sure enough there were a pretty good amount of people who were experiencing the same thing and a number of others replied they had success in adding vinegar to the basin. It's just vinegar but it always manages to surprise me so I was going to give the DIY tabs one more chance... and wow! Great results! Just like and maybe better than my store bought tabs. Crystal clear glasses and fog-less plastic... success! I love it. I'm so glad I was stubborn and determined to make it work because it paid off. Now I just use about 1/8 to 1/4 cup vinegar with each load and it works every time.
I put the tabs in my old tab container and wrote the recipe on the lid so it's quick and easy to make again when I'm low. Also, the tabs are too big for my compartment to I always end up cutting off about a third of the tab and it still works great. Next time I will use three trays instead of two.
You have got to try this recipe! And let me know what you think when you do... I hope you are as happy with it as me.
<-Kassy->
4.06.2014
DIY Art for Less Than $10!
It's been a long time since my last post. A lot has happened/changed... I got pregnant last summer and now my sweet baby girl is here. She surprised us 5 weeks early but we have loved all the extra time with her!
In the last nine months we have completed a bunch of projects, especially in getting the nursery ready so I am getting back on track and will be posting more regularly. Excited to get blogging back into my regular routine!
First up I wanted to share an easy way to add art to your home without spending a whole paycheck or even half! It's actually less than dinner for two at a fast food stop so I know you'll like it. :)
Awhile ago I picked up this set of three paintings.
The paintings are on canvas stretched on a wood frame and then finished with a gold frame. As you may guess by the photo, it's not quite our style but I liked the gold frame and you can't buy three canvases, of this size, that are framed, for this cheap anywhere! I bought all three for $10! Yup... Ten bucks. Luckily the gold fit right in with my sweet baby girl's nursery otherwise I could have done something different with the frame OR just stuck with the canvas and tossed the gold frame. Either way it was a steal though I'm sure the lady I bought them from was just glad she got $10 and thought I was weird for my excitement over this set.
The nursery is a bird theme with pinks, teals, and gold. I actually found a cute piece of art that would go perfectly in the nursery in us the price... $250! Eek. I saw it in Lily's nursery on Modern Family and loved it! (Sorry for the photo quality.... It was hard to find a decent clip to show you. The right side is from Amazon).
Nothing in our nursery cost that much so I knew it was never going to happen. Luckily for me I have a wonderfully talented artistic sister who I managed to convince to paint something similar. She was hesitant because though she is an art major this type of work isn't really her thing... I'm thinking she should reconsider! It turned out amazing... I absolutely love it and it's the perfect addition to the nursery and so cool that we can tell our baby girl that her aunt painted it just for her!
Here's both paintings.... Can you really even tell? There are some uniqueness that my sister did which just makes it even better. (Ours is on the left and the other is on the right)
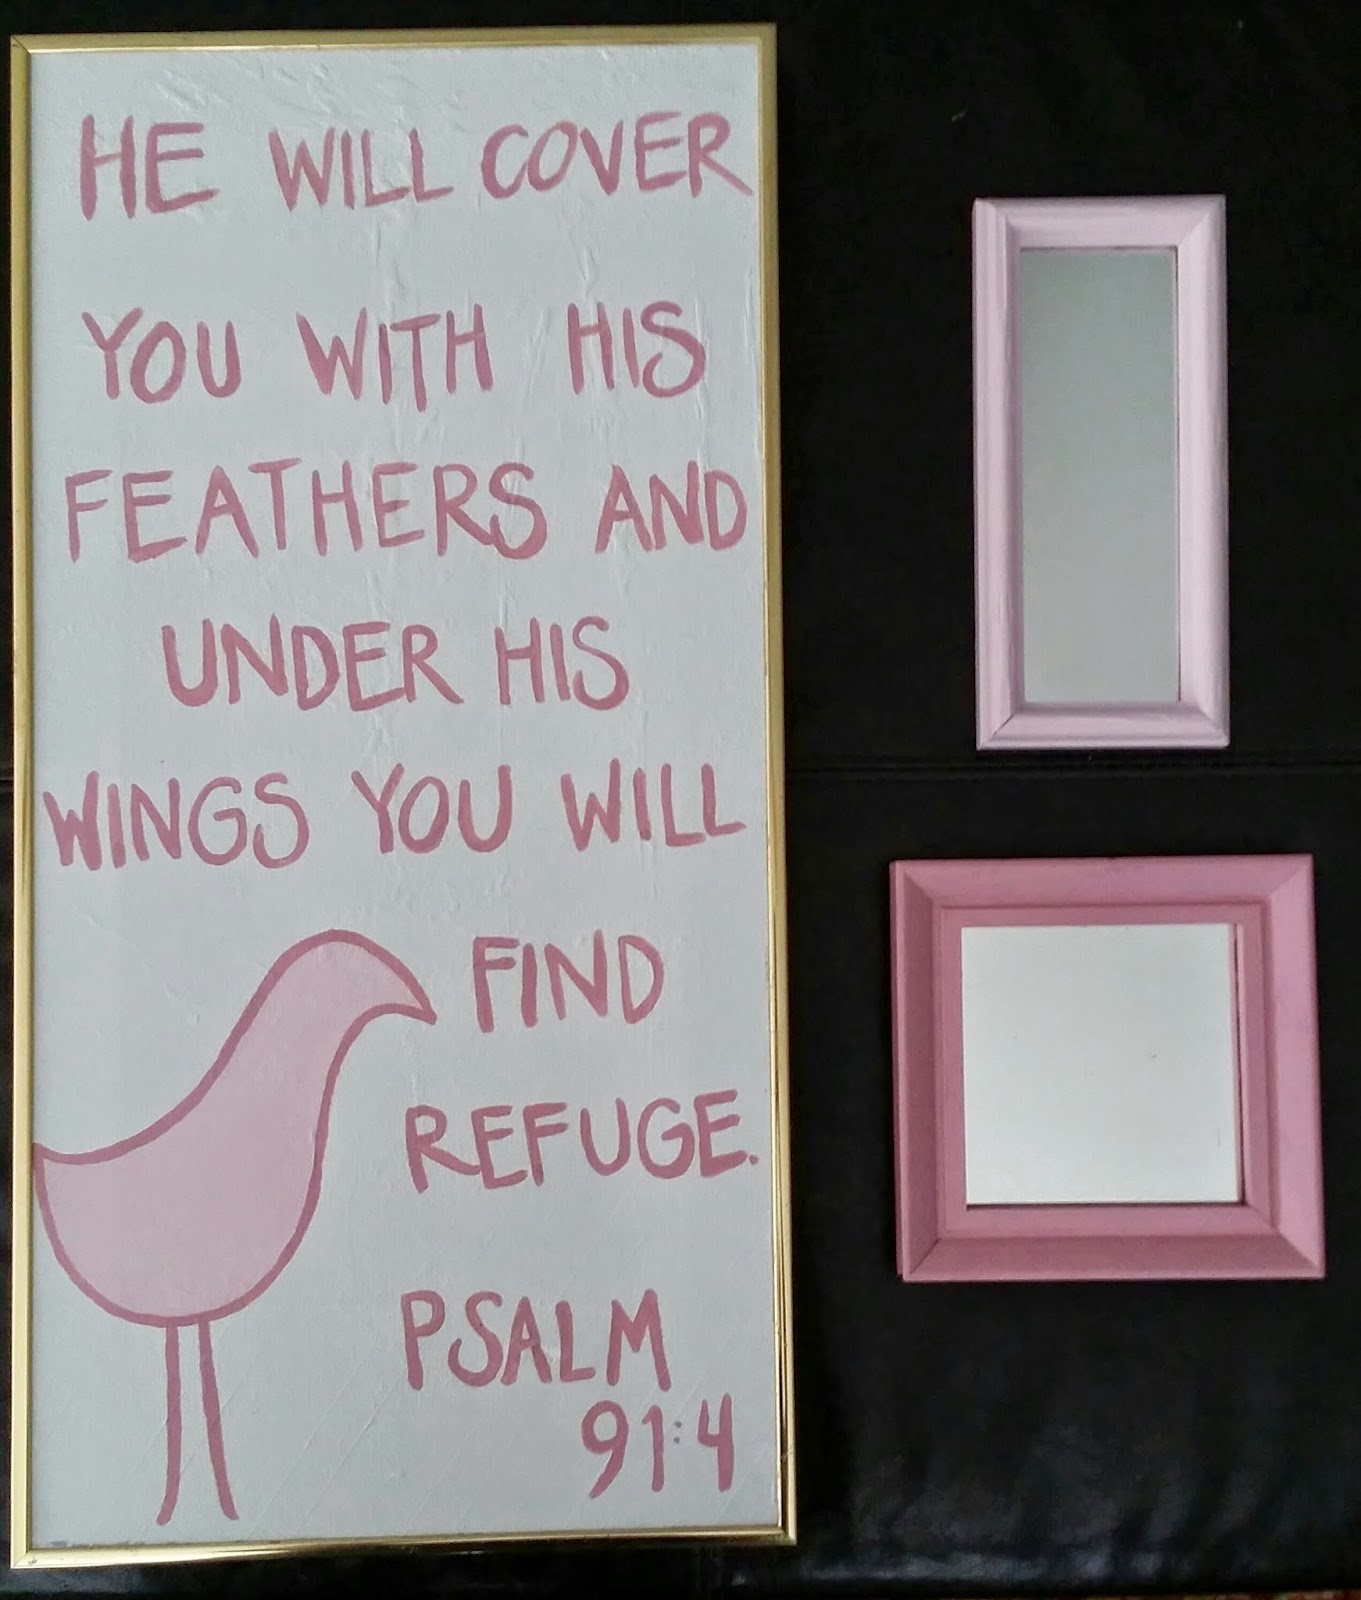
I painted one of the smaller pieces with a bible verse and a bird silhouette to go with the room. I think it turned out alright considering I am NOT an artist.
I love that I was able to use supplies I had on hand so in the end each painting cost about $3. I didn't count my sister's supplies or time (which I know was a lot) because she gave this art as a gift to our baby girl. It was the perfect gift since we all know how poor college students are... A gift of talent and love is always the best anyway! The two framed mirrors were Goodwill finds. They were $1 each and I just painted them the same pinks I used for the other artwork.
I haven't painted the third canvas yet... Still thinking about what I should do if anything at all. We'll see if I come up with something. Until then we will enjoy these two pieces and smile in knowing that we didn't spend all our money on them. The two art displays in the nursery cost us $7 for the framed canvases, $2 for the mirrors for a total of $9! I think that is $9 well spent!
What a transformation! :)
What do you think? Have you transformed art before? Have you customized/personalized art in your home? I would love to hear about it!
<-Kassy->