7.30.2012

DIY: Mobile


Hello again! :)

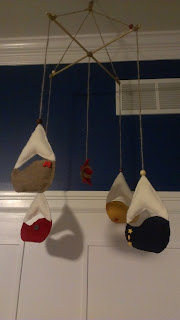
This next project (like many over the last few months) are in preparation for our baby boy! It was a fun, easy, and inexpensive project. Depending on a theme you have chosen for your nursery you can do this too! I created a mobile for the nursery that went with the theme (nautical) using sailboats and twine/rope. I have some steps and tips to create your own.

Step 1: Gather Supplies...
This project was good for the budget because I could use a lot of inexpensive material. Since the objects (sailboats) are small I used scrap fabric. Whenever I go to the craft stores I check the remnants section for good pieces that I can use for small projects. I got all this material for about $8! That's really stinkin good considering I have leftover material too! :) You'll see random appearances in later projects I'm sure.

So in total my materials list was:
Fabric - $8 (JoAnns)
1 wooden dowel - $.25 (Wal-Mart)
Twine/rope - $2 (JoAnns)
I had batting from random pillow projects already so that was a money saver for sure!
Buttons (to add some fun details... clearance and some I had already) - $4.50
Glue which I had on hand too but I think it's just $2-3 for a small tube of this heavy duty stuff.
Wood beads to add some detail... I wasn't happy about only finding this big container but I'll hold on to them for other projects - $3.50 (Wal-Mart)

So check out what 3-4 hours and about $20 gets you.....


Step 2: Sewing!!
Before I cut the sailboats I made a mini template out of some cardboard so that they were all about the same size. Cut all four sailboats and the star in the middle (two of each item). I hand stitched these because it creates a different look than with a sewing machine so anyone can definitely do this at home!

One thing I kept forgetting was to sew in the twine/rope... I would have pull out my stitches which was a pain so don't forget that you have to hang them somehow and it's better to incorporate the rope and/or string into the item instead of trying to attach it later! (Looks better and is easier). When I got to the end of each item I stuffed them with batting and then finished out the stitch.

Also, I quickly attached the buttons to each boat after they were all sewn together to add a little something extra.  (see picture below?!)


Step 3: Attach to dowel
I had help from my husband with this part. He cut the dowel in half with his saw (to make sure it was even and pretty) but you can cut these with bolt cutters too. He also notched groves in the middle of each so they would cross each other nicely. I use glue to adhere them and wrapped the with the twine/rope from the star to make sure they stayed put. After that dried I attached each boat to the ends of the dowels using the twine/rope that I sewed into them and used glue to make sure they stayed in place. The rope was long enough that after I wrapped it around the dowel and tied it in a knot I pulled it up to the center where I tied all the pieces together. If you want the mobile to sit level you have to make sure the strings from the dowel to the center point are the same length otherwise it will hang lopsided!

Step 4: Hang!
I used a hook to hang it from the ceiling and that worked perfect (it didn't weigh much so there are lots of other options to hang it too but just in case it gets yanked a few times). My husband installed the hook to make sure it wasn't coming out (following the directions :)) and then we tied the mobile to the hook.

And that's it!! It was really an easy project and I think it adds something nice to the room. :) We hung it above the changing table to keep our boy distracted while we change him but you can also hang it above the crib though it's more likely to get yanked there so make sure it's sturdy/durable!


Anyone interested in trying something similar? Let me know! I love to hear about different projects. :)

-> Kassy <-

7.24.2012

DIY: Gutter Bookshelves

I saw the most amazing idea on Raising Olives Blog and wanted to do the same thing in our baby's room. I think books, reading, learning and all things education related start at the beginning so I've made sure this is already a focus for our little boy. For my showers I asked that in lieu of a card the guests bring a book and to make it special they should write something to our baby inside the cover. :) It was a great success and I'm so thankful for the wonderful collection we have to share with our boy! Since we have a little library, storage for these books is key. I want them to be accessible for me when I'm rocking him to sleep in the first years and then accessible for him when he wants to read himself. Soooo... these gutter bookshelves are perfect! Plus I love DIYs. :D

The plan for the shelves was to hang them inside the existing wood trim boxes on the wall next to the rocker. There are three boxes and they are a little over 2' wide by 3.5' tall. This means we can fit three 2' shelves in each box... that's nine shelves (I get an A+ in math for today :)).

Here's the supply list:

- Vinyl gutters which generally come in 10' pieces (only get aluminum if you have a cut wheel and/or a saw with a carbide teeth blade and even then safety is a big factor so be sure to have all the right protective gear)

- End caps which come in right and left

- Outdoor adhesive

- Caulk - Clear drying caulk

- Screws with anchors OR you can use brackets (purchased at the hardware store as well)

And that's it!

We picked up materials at a chain hardware store. We grabbed two pieces of 10' gutters which will give us five shelves each so we'll have one extra in case we need it. I let my husband cut the gutters on his table saw (or maybe he wouldn't let me cut them... he always thinks I will lose a finger or something haha) and I cleaned them up.


One thing I recommend, because I have pets that shed, is to rub the shelves with dryer sheets. I use dryer sheets on my baseboards too and it helps to keep the hair and dirt off of them! Once they are clean you can glue the end caps to each shelf. My husband glued and I caulked.
 

Once they were dry (we let them dry over night but it doesn't take long... a few hours) we hung them. Use a level... I never hang anything without a level and try to hit studs if you can just to ensure they won't fall when our little boy yanks on them to stand up :)

 
For less than $100 we created a "library" in our nursery! Note: this is really inexpensive if you have fewer longer shelves (we had to work around the trim so we had more shelves) because the end caps are the expensive part!


How do you display your books? Any other creative ideas out there? I want to hear about them!

-> Kassy <-

7.10.2012

DIY: Baby Room Alphabet Wall Decor

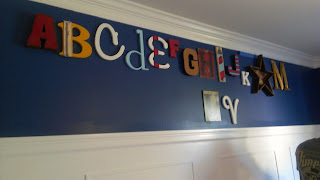
Can I just say that this was such a fun DIY?! The nice thing is that you can use the idea in a variety of ways in your own home (monograms, "Welcome", last name, etc). I saw, on Pinterest (trouble as my husband calls it), some cute baby rooms with the full alphabet with letters in different fonts, colors, and sizes. It's so fun and educational! :) So I decided to have that as a focal point in the baby's room and use the nautical theme to decorate the letters.

Over a few months I kept an eye out for unique letters and deals. I found most of the letters at Michael's, Wal-Mart, JoAnn's, and Hobby Lobby. I had a few letters (S, K, and M since those are our initials) too. The best finds were the letters where I didn't have to do anything because they were already painted and/or decorated just right! I kept a note in my phone (task app) with all the letters I had so that when I was out and about I could easily remember what letters I still needed.

Once I had all the letters I made a plan... not sure I do anything without a plan so this was no exception. :) I laid out all the letters as I would hang them on the wall to determine colors and decoration so that I didn't have a bunch that were similar in the same area.


With a plan in place it was time to get creative! My favorite time. :) I (along with my lovely friend Kristen) painted most of the letters that needed work and used some mediums to enhance them... i.e. rope, trimmings. Some I painted with designs as well including stripes or to look like a lighthouse. A few weren't painted and just used rope, trimmings, and a couple letters had cork because it was a good color and neat texture and one letter was covered in a walnut stain. Once I knew what colors I needed for each letter (from my plan) it was easier to decide on a design. I can't stress the importance of a plan enough.. don't skip this important step!

I placed all the letters on the floor in the layout again so that we could come up with a plan (another... I know.. haha.. I can't help myself) to hang all the letters. We measured the top row and found out that the left edge of the "H" was the center.


We were able to use screws/nails for a lot of letters and those that didn't have spots to hang from screws/nails we used these Command strips that are removable and re-positionable. I was concerned about the potential of letters falling off the wall since they will be above the baby's crib so I used more strips than necessary but I have peace of mind so it was worth it.


Using the "H" we started hanging the letters from there since it was the center.   


We were able to keep it fairly centered still even though we didn't measure each letter's distance from the last. We used the same method for the second row of letters.


This production totaled about $120 for the letters, trimmings, and the mounting hardware/strips. Aside from the time I took shopping for the letters, it took about 3 hours to decorate the letters and an additional hour to hang. But that's not bad for the fun impact I think this Alphabet Wall Decor makes!


-> Kassy <-