8.07.2013

DIY: Toilet Paper Roll Artwork

I have just picked up a few more kiddos during the day so things are crazy lately! I haven't quite figured out my balance yet so I have slacked on blogging and definitely slacked with projects around the house but I can't stay away for long. :)

When we moved into our house a little over a year ago I really started to notice how empty and unpersonalized our rooms were. I checked online for artwork and even poster prints are out of the budget! I liked this set but different colors to coordinate in my living room and A LOT less expensive.

I bought a pack of blank canvases on the cheap awhile back at a craft store when they were on clearance like this only in a variety pack with different sizes. The canvases cost me about $10 for 5 of them. I grabbed my acrylic paints which I have gathered over the last couple of years for various projects as well as paint brushes, foam brushes, and toilet paper rolls.... wait... what?! Yeah! The toilet paper rolls are really handy when you are trying to make designs with a repeat. You can use the circle, fold it in half, cut it, there are a ton of possibilities. Here's what I came up with:


I was pretty excited about the results considering I am not an artist! I saved a ton of money making my own art that I think I will try this again. :)


Have you tried to make your own art? Share with me what you used!

7.31.2013

DIY: Homemade Crib Rail Covers

When my little bug started pulling himself up in his crib a few months ago, he also got his first couple of teeth. The poor crib was getting eaten alive! There were so many bite marks on the top of the rails so I figured it was time to cover them up so further damage could not be done.


I want to keep this crib for awhile... it's one of those that can change as your little one changes and grows. I have a small stock of fabrics that I purchase when they are on clearance or remnants so I grabbed two pieces that would work into the nautical nursery. It was a navy blue and a red flannel which is soft too. I searched the internet before starting to get a few ideas. I came across this and thought it was nice...


But my super smart kiddo unties my shoes all the time... I feel like this would be doomed from the start! Plus it's kind of expensive for something that is so straightforward. This helped me figure out that I wanted to button it. The buttons would be on the outside so he couldn't pull on them (because I thought about the potential choking hazard) and I was going to sew them on really, really good. The crib is a little wider than the blue piece I had which I wanted for the front so I cut it down a little bit and sewed red pieces on each side. The nice thing about this project is that it is pretty simple - it's straight sides, rectangles. My sewing machine also has a neat feature that sews buttonholes which makes it even easier! After I sewed the edges to make it pretty, I measured and marked where the buttons would go between every few of the vertical bars on the crib.

Here's the before and after for you:


<-Kassy->

7.18.2013

DIY Playroom Felt Board

I am telling you the weather outside is HOT! I don't even like going to get the mail or letting the dogs out when it is this hot/muggy. So I have been happy to work and play in the new playroom. :) I am slowly getting the room together with a handful of projects so hopefully I will get those posted here in the next few weeks as well!

But the most recent completed project is a felt board. I wanted some kind of board with flexibility for many different educational lessons. I considered a chalkboard - traditional but chalk is messy, a white board - markers didn't make me excited... and what if they thought writing on any wall was ok??? So those options were out and then it hit me! Felt! Felt sticks to felt and I can make anything I want out of the felt. BINGO! Plus it's still fairly inexpensive. I bought a large piece of neutral felt using a 40% off coupon for less than $10 and I bought a ton of felt pieces for under $10 as well. For a total of less than $20 I have an AWESOME board that we can play and learn with. :)

So here's what I used:
- Large piece of neutral felt
- Many (25ish) pieces of colorful felt
- Wood trim
- Nailer

First, we cut the felt to the right size as well as the wood trim. Next, I used push pins to secure the felt to the wall in the correct spot ensuring that it was flat against the well. Using the nail gun we nailed the trim pieces to the wall (finding the studs where possible) to finish and frame the felt. The trim makes it look official!


Lastly, the fun part! I cut out shapes, letters, and numbers to use on the board. I am working on shapes/objects that cover each letter of the alphabet but I have a few already.


So what do you think? Would you put this in your playroom?

<-Kassy->

7.16.2013

DIY: Painted Doors

Last year I saw a few pins on pinterest for black doors and I was instantly drawn to it. When thinking about how you can make something so plain (a regular, builder grade, 6-panel door) beautiful, unique, and rich you would be please to find out how inexpensive this project is! It was just the cost of a gallon of paint!! We painted five doors (including a pocket door), the inside of our front steel door and both sides of the door from our laundry room to the garage.... and we still have paint leftover. Seriously, this cost less than $40 and what a huge impact!


When we took the first door down we tried a paint sprayer but didn't like the texture that it gave so we brushed and rolled the doors instead. We did not take down the pocket door because we would also have to remove the door moulding and thought that was unnecessary. We taped it and painted it while up and really it worked out great. We painted three coats on each door to make sure it covered the white so we were able to paint two doors a day.


So what do you think? Is this something you could see in your home?

<-Kassy->

7.15.2013

Layered Floor Trim

We have been working on so many projects the past few months I have been slow to write posts about them. Slowly I am catching up. It's also been a busy summer.... Spending time with my little one at the pool and loving it! He brings so much joy. :) He is getting so much better at the back float and holding his breath when he goes under water.


Back in April/May we replaced our carpet in the living room and office because I accidentally spilled paint all over our living room carpet. We searched for a durable wood/laminate floor and settled on an inexpensive, light commercial laminate flooring that would last many years with our dogs and little one(s). I am very pleased with it! When we put the flooring in we left the regular old baseboards and built on it to make it more substantial. We checked out large baseboards but they were pretty expensive so using a couple other pieces to layer we can create a similar look but not as expensive. Additionally, it's more unique! We bought the same baseboards and wood mullion trim. I have pictures below from the Home Depot website (that's where we bought the trim) so you know what we used.


We ripped the same baseboard pieces in half and put them in front of the existing baseboard which covered the gap from the new floor. This was used instead of quarter round. The mullion was placed about an inch about the top of the existing baseboard which is pictured below (top right).


Since the bottom, ripped baseboard piece was deeper than the door trim my husband cut a small wedge to finish off the edge a little nicer than leaving a cut edge (pictured top left). When all the trim was up we filled the nail holes, sanded, and painted the trim including the wall space in between the existing baseboard and the mullion.


It looks pretty good with the new floors and the freshly painted (same paint I accidentally spilled on the carpet) doors, right?! The doors will be featured in an upcoming post. :)

<-Kassy->

DIY Wood Patio Table with Drink Storage

Update 4/7/14: Hello and welcome! Since this is one of my most popular posts I wanted to give you a special welcome and also suggest that if you like what you read here then check out some of my other posts and subscribe so you don't miss any new ones! It's on the left (sorry it's not available in the mobile version) and I promise you won't receive any spam or advertisements. I hope to see you more often around here. ;)

Last month was my birthday (they just aren't as exciting as they used to be... a sign of getting old I'm sure) but I was sooooo pumped when my husband surprised me with a new patio table for my birthday! He MADE it which was even more awesome. I am so lucky he is talented and handy and sweet. :)

We had a small patio set that I purchased a couple years back at the end of the season for deep discount. It was a square table with a glass insert and 4 chair with faded, torn cushions so it was well past it's prime but we weren't making plans to replace it yet because there were other things on our list.... until.... one day the wind blew the table over. This broke the glass and we suddenly felt more inclined to replace the set.


There was a table on Domestic Engineer's site that I saw a few months back that I sent to my husband telling him that should be our next patio table because it was awesome. There was storage in the table for beer/wine/drinks which was neat and would surely be useful for us.

My husband naturally looked for a short cut and put his touch on this project and it turned out great! The beer/wine/drink storage uses two planter boxes and for our table they are removable (to wash and ensure water doesn't gather in the box when not in use). Here are two pictures, one of the underside and one of the planter box in the inset space. You can follow the directions from Domestic Engineer and instead of making the slatted wood boxes for the planters just use two 2x1s across the underside to create a ledge for the planter to sit on inset in the table.


These were taken before we stained it. I sanded it starting with a really coarse paper to a very fine paper. I used about 5-6 papers and it took around three hours.

We used red cedar wood and the stain was a semi-transparent stain so we could still see the wood grain but that it would be a little darker to go with our chairs better. We did one coat it beads the water so it is perfect. The stain is supposed to last about 3 years. If the water beads it's still good, if it does not bead then you know it's time to stain/protect it again. This table will last us a loooong time! I love it.


By the way, the new chairs we bought are metal and mesh so we do not have to worry about soggy cushions but they are still surprisingly comfortable. The chairs were at Menards on sale for $19 and came with a $7 rebate and that is the best deal we have ever seen for solid patio chairs. We bought eight because three can fit on each side plus two on the ends. They stack nicely too. :)

What do you think? Is this something you could use in your backyard??

<-Kassy->

7.11.2013

Homemade Granola

For the 4th of July weekend we visited my sister in Des Moines. We had a great time and the weather was perfect. Mason loved the pool and enjoyed the fireworks too even though he was tired. My sister treated us to some good eats but I really loved the granola she made. I have been interested in trying homemade granola and I am glad I did. I am a officially a convert to granola from cereal. It was delicious and it has all natural ingredients which is important to me.

Yesterday I made the granola and I am so pleased! Not only is it the perfect breakfast but it made my house smell amazing! I used this recipe from 100 Days of Real Food   minus coconut because I have never really been a ban. I also used two baking sheets instead of one and cooked it a few minutes less and it turned out nice a crunchy. If you like cereal then you need to try this! It is nutty and sweet with the cinnamon and vanilla.


I used old applesauce jars to store it so I could keep it fresh for the next couple weeks.

Let me know if you have tried this recipe or another recipe! I would be interested in some different variations.

->Kassy<-

DIY: Father's Day Photo Book

This year there are a lot of firsts for me and my family with a new little one in our lives.... and we are loving every minute! :) My husband is great with our son. They play and Seth teaches him which is awesome and so rewarding to watch as they grow together. I knew he was going to be a great dad but I didn't know it would be like this, which is surpassing every expectation of awesomeness that I had.

This year was my husband's first official Father's Day so I wanted to create something special for him. I wanted it to be something Mason would love too. So I came up with this "My Daddy & I" book for my husband to treasure now and for Mason to enjoy later... kiddos love hearing stories about when they were younger/babies and this would be great for that!

I used MyPublisher for this book because I had a Groupon for it which saved me some big bucks because photo books are not cheap. My experience with MyPublisher was ok. The book turned out great but putting it together was difficult (the user interface was not so easy to use and time consuming). I also was not really a fan of how they require you to download the software in order to put the book together. In the past I have tried Mixbook and Shutterfly.... Mixbook is still my favorite for ease of use and generally price because they have deals at least once per month.

The book I made is a culmination of photos showing Mason and Seth doing this together and/or similar things they both do. Some of the pages included: My Daddy & I like to play soccer, like to nap (a lot), like to be silly, like to play with the dogs, etc. Here's a snapshot of some of the pages....


It was fun to make and a sweet, memorable gift they can both enjoy for a long time. :)

->Kassy<-

7.07.2013

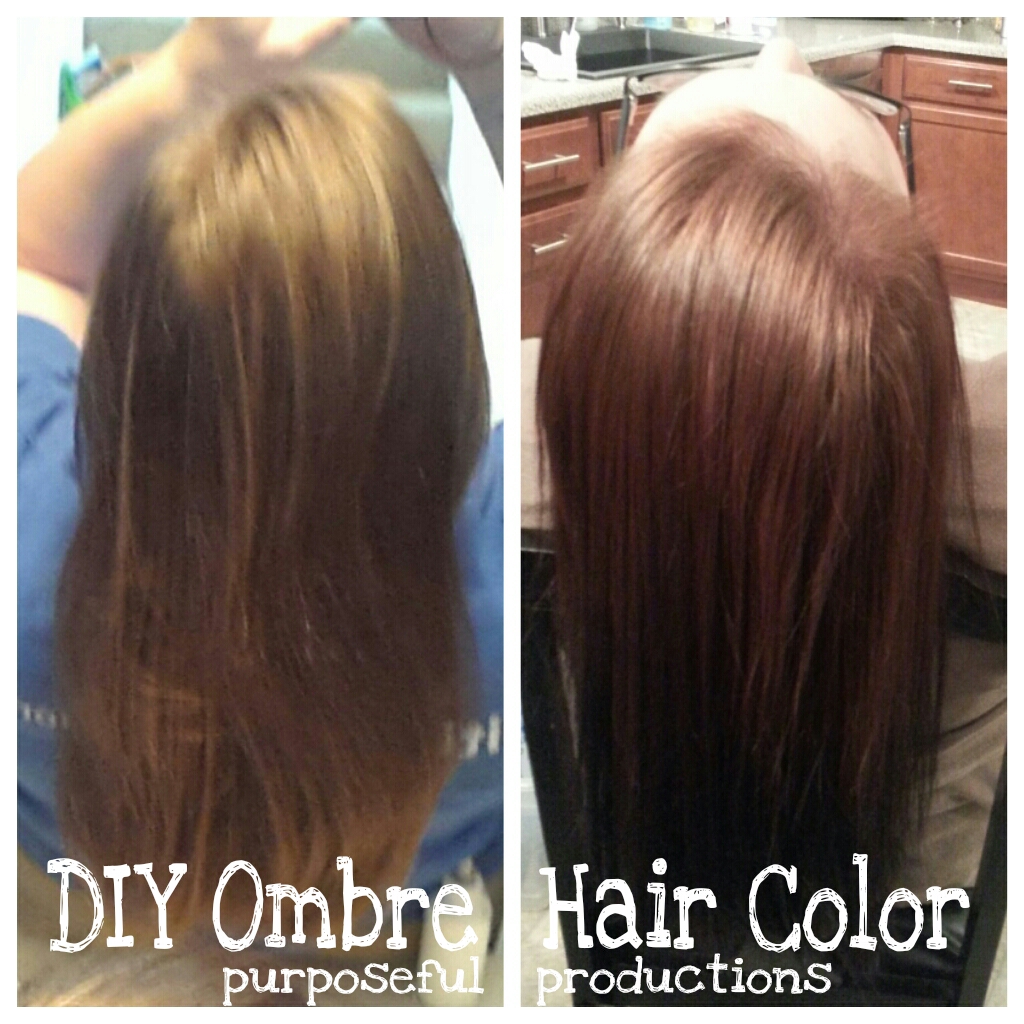
DIY Ombre Hair

With the nice summer weather I have been motivated to clean, organize, and change things up a bit. Keep watching for some fun organization tips and some new projects in the next few weeks! I'm planning to blog about the new floors my husband and I installed, new trim, painted doors, a laundry room makeover, DIY cleaning supplies, landscaping, and some fun recipes too. It has been too long since my last post but as you can see we were busy!

But for now I want to share my latest beauty project. I am sure you have seen ombre EVERYWHERE these days and even as a new hairstyle. So since my hair was blah and I had not done anything fun with it since before I got pregnant in December 2011 I wanted to try out an ombre look. But have you been to the salon lately?! Prices are skyrocketing for any services. I don't mind keeping people employed but I just can't pay $100+ on my hair and the have it touched up or redone a few weeks later. I'm a cheapskate, remember? :) That being said I conned my wonderful sister into doing a DIY ombre hair color treatment on my hair! It sounds crazy and complicated but it was not too bad, just LONG. Here's what we used: 


Step 1:
Make sure you use a clean head of hair but not freshly conditioned. Hair should be dry to start but can be wet if you are running short on time.

Step 2:
Separate your hair into 4/5 sections (depending on how many dyes you have, 4 sections for 4 dyes, 5 sections for 5 dyes, etc).

Step 3:
Dye your crown (top section) the first color as directed. Clean and rinse as directed as well.

Step 4:
Dye the second section the second color as directed as well as the portion of the first section that overlaps the second section. Clean and rinse as directed.

Step 5:
Repeat Step 4 for all of the remaining dyes as directed and working the color down to the ends which gives the ombre look.

Step 6:
Once dying is complete condition your hair. You can use your regular condition but I recommend a stronger repair conditioner because dying your hair is damaging in general. I used L'Oreal's repair serum and that really helped soften my hair.

Now you can enjoy your new ombre look!


I spent about $2 per box of color with coupons which totals $8 for my new do! :)

[Please note that I am not a beautician, a professional, etc. I am just a thrifty mama who tried this and it was a success. There are risks in doing this on your own so please follow the package directions closely!]

<-Kassy->

PS - This was months ago... a little slow on getting this blog post up so hopefully none of you compliment me on my new hair. :)

How to Clean (and KEEP Clean) a Toaster Oven

Update 4/7/14: Hello and welcome! Since this is one of my most popular posts I wanted to give you a special welcome and also suggest that if you like what you read here then Check out some of my other posts and subscribe so don't miss any new ones! It's on the left (sorry it's not available in the mobile version) and I promise you won't receive any spam or advertisements. I hope to see you more often around here. ;)

Cleaning.... it's never-ending... literally. But there are ways to make it quick and easy so that you don't have to spend your entire day cleaning and missing out on fun! So here's a quick tip for those counter top toaster ovens. I don't know about everyone else but we use ours a lot.... instead of heating pizza in the microwave I throw it in the toaster oven (it's crispier rather than soggy) or toast or anything really that needs heating or crispiness. So over time it gets pretty grimy! I figured it need to be a part of my regular cleaning routine here's what I recommend for you guys to make it much easier!

For this first deep clean I:

  1. Removed the rack and the bottom pan 
  2. Soaked and scrubbed both with baking soda and vinegar (and my favorite, handy-dandy cleaning tool, a toothbrush). While these were soaking I made a vinegar, baking soda, lemon paste and used the toothbrush to scrub the rest of the oven. NOTE: Please unplug before you do any of this! Don't burn yourselves.... that will halt your cleaning for sure! 
  3. Scrubbed the door (both sides), the heating strips, the sides, bottom, outside buttons, etc.  
  4. Took a damp cloth over the entire oven and then followed up with a dry, clean cloth. 
  5. Once all pieces were clean I got out my aluminum foil.... pay attention... this is where you have an ah-ha moment and your future cleanings become so much easier! I wrapped foil around the pan that goes in the bottom of the oven. Yeeeeeah, that was anti-climatic but I swear this will make it easier. 
Along with the foiled pan if you wipe it down after each use then a deep clean is only needed once a month (or maybe a little longer depending on how much you use yours) and all you will have to do is a quick wipe down and replacement of the foil.

This literally takes less than 5 minutes! Hooray for quick and easy cleaning! :)


Keep an eye out for my next cleaning post... I am going to explain my methods and secrets to a clean home without spending hours each day cleaning! In fact I guarantee a clean home in 30 minutes or less each day.

What cleaning secrets do you have? Please share! I always look for new, improved ways!

<-Kassy->


7.03.2013

Quinoa Breakfast Sausage Recipe

Recently, I have become a fan of quinoa. I like rice (though my husband doesn't) and can easily substitute and use quinoa to provide a little bit more protein and nutritional value. Quinoa is considered a grain but is actually a seed. It has a similar texture to rice and takes on flavors that you cook with it. For example, you can use broth (chicken or beef) with quinoa or fresh herbs and EVOO and the quinoa will take on those flavors. I have tried a number of recipes lately and started experimenting as well. I pulled this recipe together one day because I had italian sausage and peppers to use up before the went bad (or I had to freeze them). I call it "breakfast" but the first time we tried this recipe it was for dinner and it was delicious either way!

So here's the deliciousness.... :)

Ingredients:
- 1 lb italian sausage
- 1 large green pepper (or any color that is your favorite)
- 3 large eggs
- 1 cup uncooked quinoa
- 2 T italian seasoning

Directions:
Cook/brown italian sausage in large skillet. In a separate saucepan cook 1 cup quinoa according to directions on package. While the sausage and quinoa cook, dice the large pepper. When the sausage is cooked push the meat to one side and crack all three eggs in the cleared side of the pan. You can use a separate pan but I am all for fewer dishes! After the eggs cook for a few minutes (the yolk may still be runny) chop up the egg and continue chopping to help it cook and when the eggs are cooked and chopped you can mix them into the sausage. Next, mix in the cooked quinoa and italian seasoning. You can mix the peppers in at any time but I like them to be raw so I fold them in before serving.

And that's pretty much it! Now you can enjoy.... really enjoy. :)


What quinoa recipes have you tried that are delicious? I am interested to try some new ones!

God Bless and Happy 4th!

<-Kassy->

5.16.2013

Whiskey & Balsamic Vinegar Steak Marinade

I'm getting straight to the point today.... Have you seen this pin floating around?


I sure have and thought it looked delicious so I repinned it. Well I was so disappointed to find out that blog was deleted. :(  But it seemed like it was a pretty straightforward so I decided to just go for it yesterday for dinner. Oh I do not regret it one bit! It was entirely too good. I bought a two pack of bacon wrapped filet mignon ($6 at the supercenter) which I thought would be perfect to try with this marinade.


First I pierced the filets with a fork on both sides all over. I used one shot of whiskey and one shot of balsamic vinegar and poured both over the filets in a small container. The mix started seeping in immediately and the strength of the whiskey filled my fridge while it marinaded. :) After about an hour I put the filets in a glass baking dish and broiled them for 8 minutes on each side. They were tender, juicy, and very full of flavor. The words from my hubby's mouth "It tastes like red wine!" He LOVED these filets. I will say that I added a little bit of italian seasoning too just for a little something extra and because I don't like to add flavor with salt. These were great with some garlic whipped potatoes and edamame. A glass of red wine wine would have also been a delicious pairing.

I hope you try it (and like it) soon! If you do try it then let me know what you think.

-> Kassy <-

3.29.2013

Money Saving Tip: Just Between Friends

We went to a fish fry at my in laws on Sunday. It was fun and delicious! :) I'm not a fish eater and luckily others feel the same way so there was more than just fish there. I was talking to everyone about my search for a cozy coupe (you know one of those red and yellow Flintstones type cars?!) and that's when my husband's aunt told me about a baby/kid extra large "garage sale" type thing they have just a couple times a year but she couldn't recall the name of it.

So the coincidence is that the very next day she saw it as a special story on the news! The sale was this week at the nearby convention center. It's called Just Between Friends (JBF) Sale and it occurs twice a year (spring and fall). When searching through their website I found out that there a ton of cities that have these sales! If you aren't near me in St Charles, MO then you can checkout their website to see if there is a franchise near you. And everyone else should just go sign-up for the newsletter so you don't miss the next one. Here's the gist of what I found at the sale:

Lego tray table and a bag full of Legos: $20
Race cars (about 8-10): $2
Race car track: $2
A HUGE stuffed Elephant in excellent condition: $5
A shopping cart cover (barely used, in the box): $7
Pull along dinosaur (cutest thing I have ever seen): $8
2 silicone Baby Bjorn bibs with the "tray": $7
Travel booster seat: $3 (WHAT?! Yeah crazy)
2 Kiddopotamus Swaddle Mes (for my friend who is pregnant): $6
Tool set: $8
And clothes wise I found...
1 Pair of Jeans, 1 button up, 1 sweater vest, 6 PJs, 1 swim shirt, 4 summer rompers, 2 polo onesies and something else that I am missing for about $35!

They are having a little contest for those that take pictures of their little ones with the JBF items they purchased and post it to their Facebook page so we put a little message together with the Legos, cars, and tools that we got. :)


There was a ton more that I wanted to get but I needed to restrain myself a little for budget sake! But this is my new favorite thing because I don't have to spend a fortune on toys AND I don't have to be frustrated when my son or other kiddos ruin them. It's kind of like our fridge. We bought it with a small dent in the handle (we got a screaming deal) and now when we ding it accidentally I kind of don't care... it already has one so oh well. Haha. Anyhow, JBF also has consignment so you can sell your stuff! In my terms it's selling to pay for the stuff I will buy at the sale but it's nice because I will basically only ever spend the original investment and then simply use the money earned from consignment to buy the next set of toys/clothes. Sounds perfect to me and our budget is loving it too.

I hope this tip helps you out! Have you visited a JBF sale before? Did you find any great deals?

<- Kassy ->

3.06.2013

DIY: Bathroom Organization

This past weekend I visited my sister in Des Moines and we had a great time! It was a great sister weekend (minus one but she's enjoying Spain so she's not really missing out). On Friday night we went to a fun restaurant called Zombie Burger. It was awesome! The burgers and shakes were to die for (see what I did there? Zombies... to die for... ok yeah... I'm corny)! I tried the Dawn of the Dead burger with bacon egg and cheese on a burger and bun. Oooooh so delicious. And then after we dinner we each got a shake - wow. I ordered the Cinnamon Toast Crunch Shake which was vanilla ice cream, Cinnamon Toast Crunch, and rum chata... whew, perfect. My sister ordered the Zombie Bride Cake Shake and that was also scrumptious. It was made with vanilla ice cream, yellow cake mix and cake vodka. Can you imagine just slurping cake batter? Because that's what it tasted like! I can't wait to try these at home AND maybe in a less fattening way?! Anyhow, to say the least I am a little jealous we don't have a Zombie Burger here in St Louis.

The good thing about me going out of town is that my wonderful husband finished a couple projects for me! I feel like we are finally getting to a point where our home is feeling less builder grade and a little more comfortable. Sometimes it is the little things that make a big difference! So what did my hubby do, you ask? Well, first he added shelving to our master closet. I needed this bad because my clothes were so jam packed, even after I donated a large amount.

Additionally, he hung a crate that I stained to store rolled towels. I purchased the unfinished crate at JoAnn's. I used a 50% off one item coupon so the crate was only $6! I used leftover stain to stain that crate and a few other items I plan to use for other projects (the list is never ending). The stain I use for these quick little projects is a poly stain which is a stain with a poly finish all in one. It is quick AND easy when completing these projects. Just a side note that it will get on your hands and will be sticky but within a day it will wash off. It turned out pretty nice I think! I am planning on also adding a smaller crate, also stained, below it for smaller cloths and/or toilet paper.


My husband also installed small pieces of PVC under my sink in the bathroom. I am using those pieces to hold my hair dryer and straightener. He also put an outlet under the sink as well. Basically, I can keep them plugged in and when I need them I open the door, use them, and then put them back. :)  It's handy for me but I convinced my husband also loves it because he hates when my hair dryer and/or straightener are left out on the sink counter.


 Love these organization projects! Makes me feel so much less stressed when things are easy and in order. What about you? Any Spring Cleaning/Organization happening in your home?

<- Kassy ->

2.28.2013

DIY: Baby Story Book

I am LOVING my time at home with Mason. He is so sweet and it's been a great bonding experience. I am also really excited to try our infant/child education program called Parents as Teachers. The program is designed to help parents educate and prepare children for school. More to com on that I am sure!

On of the fun things I have been able to focus on now that I am home is transitioning Mason to vegetables and fruits. Mason has really been enjoying his homemade baby food.  He loves butternut squash and pears too. He is not so much a fan of green beans though haha :) This morning I gave him a big spoonful of butternut squash and he decided to give me a big sneeze. Yup. A nice coating of butternut squash all over my face, glasses, arm, etc. It was cute none the less because he thought it was funny and gave me a little chuckle after!


See the spatter? Yeah he get too distracted to look at the camera now but I thought he was still cute with all that mess. 

Okay getting to my point! I recently ordered and received my son's baby book (finally now that he is 6 months... I know) and I am so excited about it. I turned the maternity journey and his birth into a story. One that we can read as he grows up.... Many kids like to hear about when they were born and this is an easy way to document his birth while telling a story in a book that we can read over and over. I stumbled upon a blog at some point in the last year with a story child's book (though I think it was for an older sibling when their younger sibling was born) but wouldn't you know I can't find that blog anywhere now. I like giving credit but maybe I just dreamed that up? That is why I pin things because I can't remember all these ideas and blogs!

So I have used a couple of photo book sites and so far my favorite is Mixbook. I first used it a couple years ago because there was a Groupon ($15 for $50) which turned out to be an AWESOME deal. I used it for my wedding book. Instead of paying hundreds of dollars through my photographer, I made my own through Mixbook and it turned out great. Plus it was less than $50 with the Groupon. Whoop! Love saving money. :)

So anyhow, here is a couple of snapshots of Mason's book and I have included a link for you to sign-up for Mixbook. If you use my link you will save $10 off your first book! Go here to sign-up and get your savings.


Here are the other pages!


Wondering how the next baby story book will go? :) Time will tell!

-> Kassy <-