4.08.2014

DIY Wood Accent Wall

As I was contemplating some neat ideas for our baby girl's nursery I decided to check out my home decor boards on Pinterest (you can follow me on Pinterest here). Sometimes I forget what I like and have on my dream boards.  :)

One of the pins that struck me was this pallet wood wall project over here. I thought this would be the perfect addition to the nursery and fit in with the natural, girly bird theme. I, of course, needed to keep this project within a tight budget so at first I thought the best option was to use pallets. I've seen those projects and they turn out great plus people have found pallets for free or cheap and that is right up my alley!

I did some research and came to find out that pallet wood is not recommended in nurseries (or in any interior space) because of the bugs that infest the wood as well as the chemicals used on the wood. So in my search for the next best option I found this project over at Thrifty Decor Chick that turned out really nice!

We actually found the wood planks pictured below at a big box hardware store AND lucky for us there was a special promotion where we received a rebate for 50% of the cost... Music to my ears! We bought the amount we needed for the wall (8' x 10' = 80') plus two extra boxes for mistakes and to cover any pieces that were not straight or may have been broken. We also bought a pint of stain and two pieces of pine quarter round to trim each side. I have the full budget at the end of the post but for now let's check out a few pictures from the project and talk about the process.


My hubby and father-in-law installed the wood in just a couple hours using a nail gun so if you have one then use it and if you've got a father-in-law (or a brother or a cousin or a neighbor.... you get the idea) then rope him/her in to help! Before they started they marked all of the studs along the wall which is where they strategically placed the joints of the wood planks so that when they nailed the end the nails would hit the studs. This ensures the planks are secured firmly to the wall. The guys started from the top, at the ceiling, and worked down to the floor. They staggered the planks too because I liked the way that looked since one plank would not cover the length of the wall. The floor trim was removed so when the last plank was shy of the floor it worked ok because we were planning to replace the trim which would cover the gap.


Once the wood was installed we taped the edges and stained the planks. We used Minwax stain in Java. We applied the stain to 3-4 rows starting at the top and then would wipe the stain off.  This gave it enough time to soak in to the wood a little. We repeated this to the bottom. Stain is pretty messy so even though I taped the edges there was spray from the brush strokes that hit the walls and ceiling which we touched up later. After completing the stain on the planks we stained the quarter round trim pieces and then reinstalled the trim at he floor. Next we installed the quarter round trim and that completed the project! In total I would estimate the project took 2 hours for 2 guys to install the wood, 1 hour for the two of us to stain and about an hour to put the finishing touches on the project and clean up... 4 hours total! I have to say that I think it looks great!


Here's the budget breakdown:
$67 wood planks (originally $134 but we received a rebate for 50%)
$7 stain
$16 pine quarter round (about $1 per linear foot... 2 corners x 8' height)
TOTAL: $100!!!

The supplies I had on hand were the nails, nail gun, tape, we reused the baseboard trim and just touched up the paint. And that's it! Loved the results and it was well worth the $100 and 4 hours.

What do you think? Could you see this on a wall in your home?

<-Kassy->

4.07.2014

DIY Dishwasher Tabs

I'm feeling good these days... finally getting some sleep. My baby girl is a little over six weeks now and she has just turned a corner in the sleeping/eating departments. I knew that it was going to be a little more difficult with her than my son because she was born five weeks early but geez... I have been a zombie the last six weeks! She was nursing every 2-3 hours and that means she wasn't sleeping through the night. My husband and I were so perplexed at how hard it is to wake her and keep her awake during the day and pretty much impossible to get her to sleep at night?!

I recently ran out of dishwasher tabs and since we run the dishwasher every other day it's not really something I can go without. I haven't ventured out too many times on my own with them because I'm still adjusting to two kiddos. I certainly don't like going out for one last minute item, if I'm going out I'm making a morning of it and getting it all done. It's too much work for a five minute grocery store run! So I found this recipe for DIY tabs and I happened to have all the ingredients. Worth a try, right?

I went to work putting them together and I chose the solid tab route using two ice cube trays since that is what we are used to. I was so excited to try them because of this worked it would be amazing... cheap and I would know the ingredients in them. Win!

I ran the dishwasher the next morning and was so disappointed with the results. My dishes were foggy and had a residue. Barely even clean! Darn! I tried them a few more times on different settings (hi-temp, extra rinse, etc) and still the same results.

It's always frustrating to me when it "works great" on the internet and fails in real life so I went back to the blog where I found the recipe to see if anyone that commented had the same problem. Sure enough there were a pretty good amount of people who were experiencing the same thing and a number of others replied they had success in adding vinegar to the basin. It's just vinegar but it always manages to surprise me so I was going to give the DIY tabs one more chance... and wow! Great results! Just like and maybe better than my store bought tabs. Crystal clear glasses and fog-less plastic... success! I love it. I'm so glad I was stubborn and determined to make it work because it paid off. Now I just use about 1/8 to 1/4 cup vinegar with each load and it works every time.

I put the tabs in my old tab container and wrote the recipe on the lid so it's quick and easy to make again when I'm low. Also, the tabs are too big for my compartment to I always end up cutting off about a third of the tab and it still works great. Next time I will use three trays instead of two.


You have got to try this recipe! And let me know what you think when you do... I hope you are as happy with it as me. 

<-Kassy->

4.06.2014

DIY Art for Less Than $10!

It's been a long time since my last post. A lot has happened/changed... I got pregnant last summer and now my sweet baby girl is here. She surprised us 5 weeks early but we have loved all the extra time with her!


In the last nine months we have completed a bunch of projects, especially in getting the nursery ready so I am getting back on track and will be posting more regularly. Excited to get blogging back into my regular routine!

First up I wanted to share an easy way to add art to your home without spending a whole paycheck or even half! It's actually less than dinner for two at a fast food stop so I know you'll like it. :)

Awhile ago I picked up this set of three paintings.


The paintings are on canvas stretched on a wood frame and then finished with a gold frame. As you may guess by the photo, it's not quite our style but I liked the gold frame and you can't buy three canvases, of this size, that are framed, for this cheap anywhere! I bought all three for $10! Yup... Ten bucks. Luckily the gold fit right in with my sweet baby girl's nursery otherwise I could have done something different with the frame OR just stuck with the canvas and tossed the gold frame. Either way it was a steal though I'm sure the lady I bought them from was just glad she got $10 and thought I was weird for my excitement over this set.

The nursery is a bird theme with pinks, teals, and gold. I actually found a cute piece of art that would go perfectly in the nursery in us the price... $250! Eek. I saw it in Lily's nursery on Modern Family and loved it! (Sorry for the photo quality.... It was hard to find a decent clip to show you. The right side is from Amazon).


Nothing in our nursery cost that much so I knew it was never going to happen. Luckily for me I have a wonderfully talented artistic sister who I managed to convince to paint something similar. She was hesitant because though she is an art major this type of work isn't really her thing... I'm thinking she should reconsider! It turned out amazing... I absolutely love it and it's the perfect addition to the nursery and so cool that we can tell our baby girl that her aunt painted it just for her!

Here's both paintings.... Can you really even tell? There are some uniqueness that my sister did which just makes it even better. (Ours is on the left and the other is on the right)


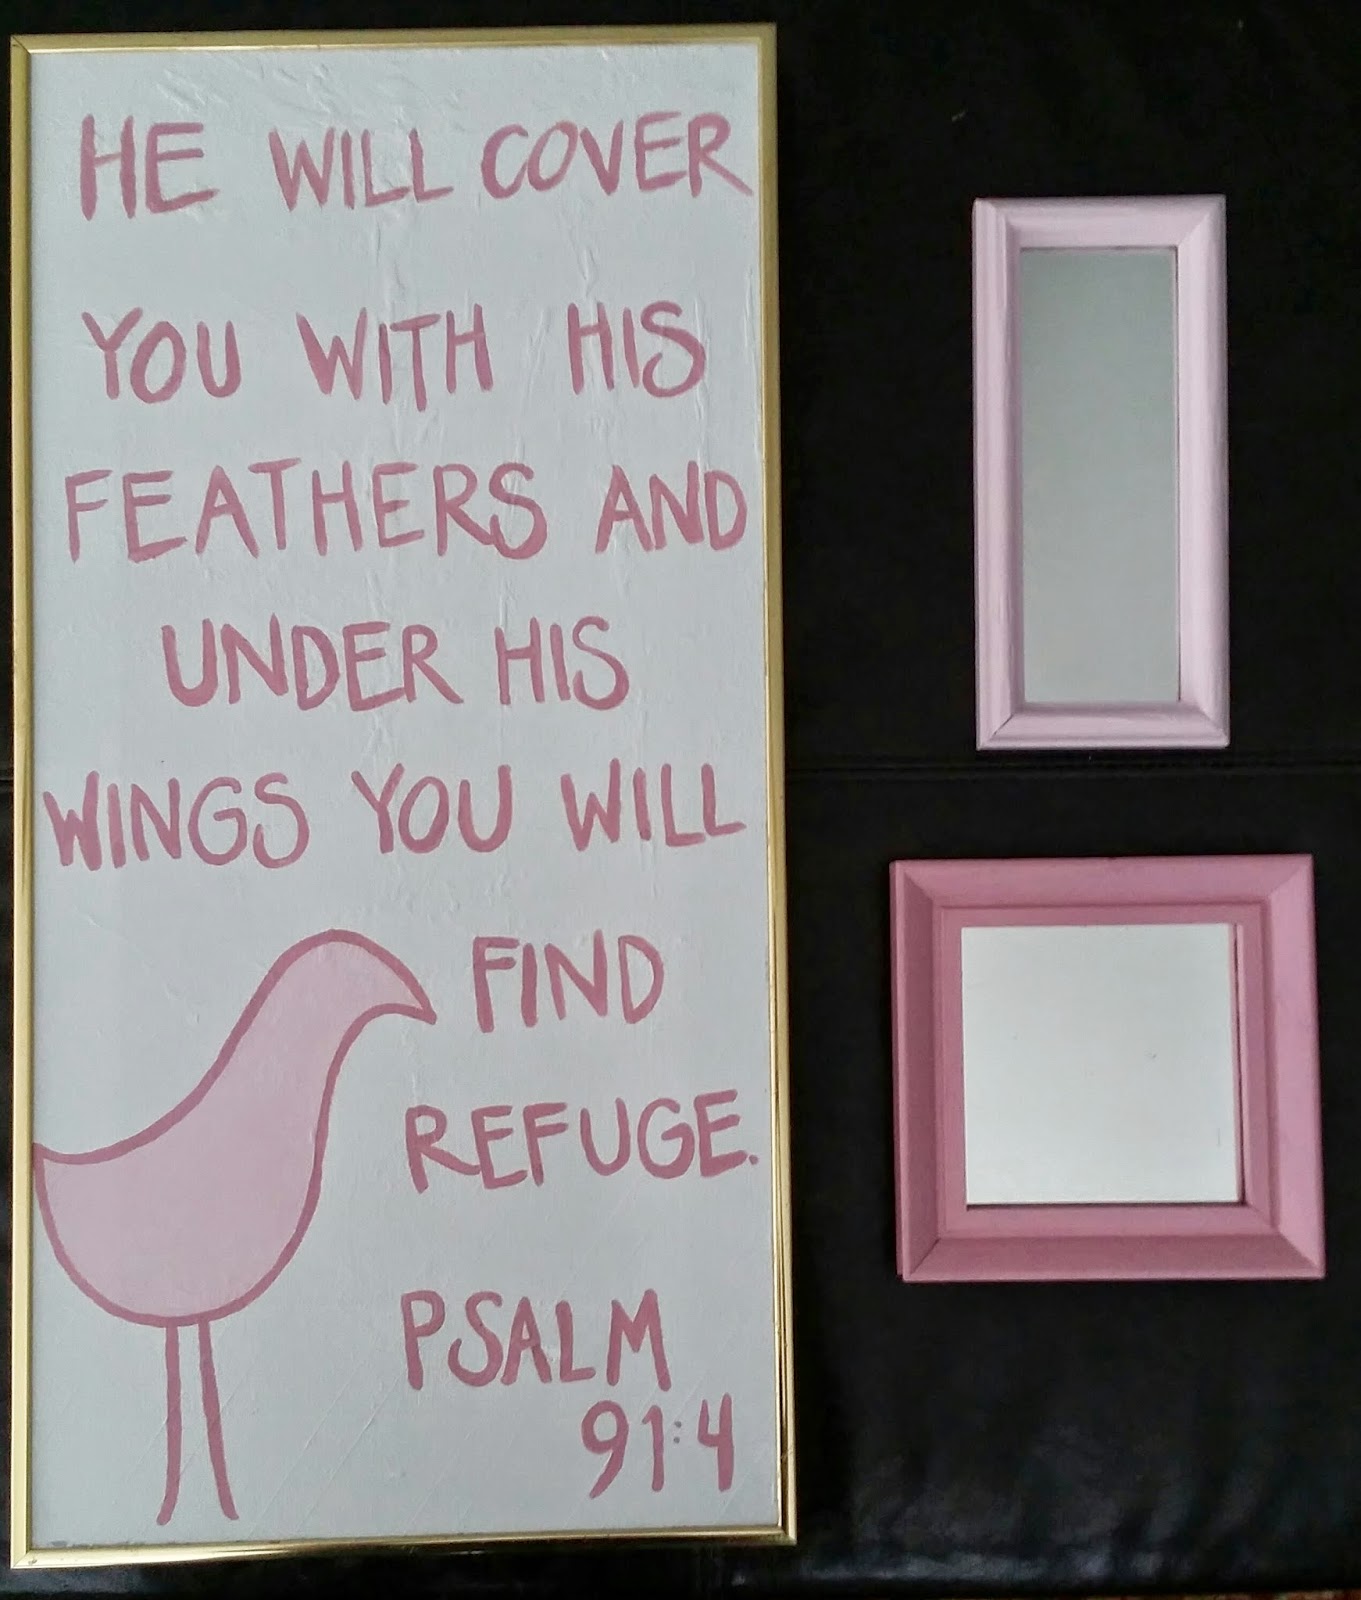
I painted one of the smaller pieces with a bible verse and a bird silhouette to go with the room. I think it turned out alright considering I am NOT an artist.


I love that I was able to use supplies I had on hand so in the end each painting cost about $3. I didn't count my sister's supplies or time (which I know was a lot) because she gave this art as a gift to our baby girl. It was the perfect gift since we all know how poor college students are... A gift of talent and love is always the best anyway! The two framed mirrors were Goodwill finds. They were $1 each and I just painted them the same pinks I used for the other artwork.


I haven't painted the third canvas yet... Still thinking about what I should do if anything at all. We'll see if I come up with something. Until then we will enjoy these two pieces and smile in knowing that we didn't spend all our money on them. The two art displays in the nursery cost us $7 for the framed canvases, $2 for the mirrors for a total of $9! I think that is $9 well spent!


What a transformation! :)

What do you think? Have you transformed art before? Have you customized/personalized art in your home? I would love to hear about it!

<-Kassy->

8.07.2013

DIY: Toilet Paper Roll Artwork

I have just picked up a few more kiddos during the day so things are crazy lately! I haven't quite figured out my balance yet so I have slacked on blogging and definitely slacked with projects around the house but I can't stay away for long. :)

When we moved into our house a little over a year ago I really started to notice how empty and unpersonalized our rooms were. I checked online for artwork and even poster prints are out of the budget! I liked this set but different colors to coordinate in my living room and A LOT less expensive.

I bought a pack of blank canvases on the cheap awhile back at a craft store when they were on clearance like this only in a variety pack with different sizes. The canvases cost me about $10 for 5 of them. I grabbed my acrylic paints which I have gathered over the last couple of years for various projects as well as paint brushes, foam brushes, and toilet paper rolls.... wait... what?! Yeah! The toilet paper rolls are really handy when you are trying to make designs with a repeat. You can use the circle, fold it in half, cut it, there are a ton of possibilities. Here's what I came up with:


I was pretty excited about the results considering I am not an artist! I saved a ton of money making my own art that I think I will try this again. :)


Have you tried to make your own art? Share with me what you used!

7.31.2013

DIY: Homemade Crib Rail Covers

When my little bug started pulling himself up in his crib a few months ago, he also got his first couple of teeth. The poor crib was getting eaten alive! There were so many bite marks on the top of the rails so I figured it was time to cover them up so further damage could not be done.


I want to keep this crib for awhile... it's one of those that can change as your little one changes and grows. I have a small stock of fabrics that I purchase when they are on clearance or remnants so I grabbed two pieces that would work into the nautical nursery. It was a navy blue and a red flannel which is soft too. I searched the internet before starting to get a few ideas. I came across this and thought it was nice...


But my super smart kiddo unties my shoes all the time... I feel like this would be doomed from the start! Plus it's kind of expensive for something that is so straightforward. This helped me figure out that I wanted to button it. The buttons would be on the outside so he couldn't pull on them (because I thought about the potential choking hazard) and I was going to sew them on really, really good. The crib is a little wider than the blue piece I had which I wanted for the front so I cut it down a little bit and sewed red pieces on each side. The nice thing about this project is that it is pretty simple - it's straight sides, rectangles. My sewing machine also has a neat feature that sews buttonholes which makes it even easier! After I sewed the edges to make it pretty, I measured and marked where the buttons would go between every few of the vertical bars on the crib.

Here's the before and after for you:


<-Kassy->

7.18.2013

DIY Playroom Felt Board

I am telling you the weather outside is HOT! I don't even like going to get the mail or letting the dogs out when it is this hot/muggy. So I have been happy to work and play in the new playroom. :) I am slowly getting the room together with a handful of projects so hopefully I will get those posted here in the next few weeks as well!

But the most recent completed project is a felt board. I wanted some kind of board with flexibility for many different educational lessons. I considered a chalkboard - traditional but chalk is messy, a white board - markers didn't make me excited... and what if they thought writing on any wall was ok??? So those options were out and then it hit me! Felt! Felt sticks to felt and I can make anything I want out of the felt. BINGO! Plus it's still fairly inexpensive. I bought a large piece of neutral felt using a 40% off coupon for less than $10 and I bought a ton of felt pieces for under $10 as well. For a total of less than $20 I have an AWESOME board that we can play and learn with. :)

So here's what I used:
- Large piece of neutral felt
- Many (25ish) pieces of colorful felt
- Wood trim
- Nailer

First, we cut the felt to the right size as well as the wood trim. Next, I used push pins to secure the felt to the wall in the correct spot ensuring that it was flat against the well. Using the nail gun we nailed the trim pieces to the wall (finding the studs where possible) to finish and frame the felt. The trim makes it look official!


Lastly, the fun part! I cut out shapes, letters, and numbers to use on the board. I am working on shapes/objects that cover each letter of the alphabet but I have a few already.


So what do you think? Would you put this in your playroom?

<-Kassy->

7.16.2013

DIY: Painted Doors

Last year I saw a few pins on pinterest for black doors and I was instantly drawn to it. When thinking about how you can make something so plain (a regular, builder grade, 6-panel door) beautiful, unique, and rich you would be please to find out how inexpensive this project is! It was just the cost of a gallon of paint!! We painted five doors (including a pocket door), the inside of our front steel door and both sides of the door from our laundry room to the garage.... and we still have paint leftover. Seriously, this cost less than $40 and what a huge impact!


When we took the first door down we tried a paint sprayer but didn't like the texture that it gave so we brushed and rolled the doors instead. We did not take down the pocket door because we would also have to remove the door moulding and thought that was unnecessary. We taped it and painted it while up and really it worked out great. We painted three coats on each door to make sure it covered the white so we were able to paint two doors a day.


So what do you think? Is this something you could see in your home?

<-Kassy->